
Chimney Flashing Repair
Expert Chimney Flashing Repair to stop roof leaks, seal gaps, and protect your home from moisture damage around the chimney base

Inspections

Fires Prevented

Chimney Sweeps

Chimney Repairs
Chimney Flashing Repair Explained
Chimney flashing is the metal barrier installed where your chimney meets the roof. It’s designed to seal that gap and keep water from sneaking into your home. When we talk about chimney flashing repair, we’re talking about fixing or replacing those metal pieces when they start failing at their job.
Here’s what that really means. Your chimney is a solid structure that doesn’t move much. Your roof, on the other hand, expands and contracts with temperature changes. That gap between them needs a flexible seal that can handle that movement while keeping rain, snow, and ice out. That’s what flashing does.
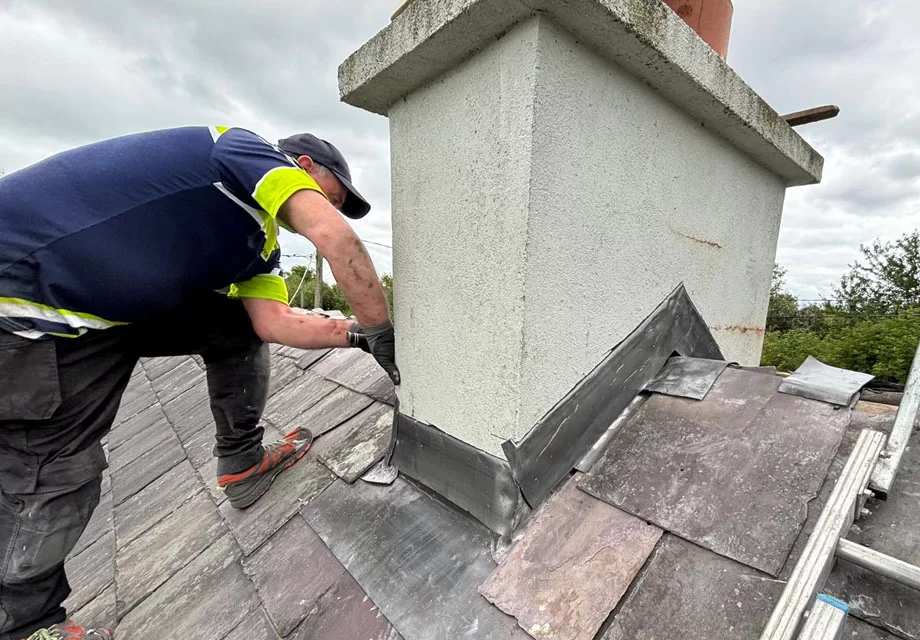
The flashing itself sits in layers. Step flashing runs along the sides where the chimney meets the sloped roof. Counter flashing fits into mortar joints on the chimney and overlaps the step flashing below. Base flashing covers the front and back. When any of these pieces get damaged, cracked, or pull away from where they’re supposed to be sealed, you’ve got a problem.
What Repair Actually Involves
Most homeowners don’t realize that flashing repair isn’t about the chimney bricks or the roof shingles themselves. It’s specifically about those metal pieces and their seals. Over time, the sealant cracks. The metal corrodes, especially here in Indianapolis where we get intense sun and sudden storms. Sometimes the counter flashing pulls out of the mortar joints.
What usually happens is a roofer removes the damaged flashing sections, cleans up the area, and installs new pieces. They’ll reseal everything with proper roofing cement or caulk. If the counter flashing pulled out, they’ll reset it into the mortar joints correctly. The goal is restoring that weatherproof barrier so water stays outside where it belongs.
When flashing fails and you don’t fix it, water gets into your attic, soaks the wood framing around your chimney, and eventually shows up as ceiling stains or mold. It might not look serious at first, but that’s usually when problems start getting expensive.
How Chimney Flashing Repair Works
A proper chimney flashing repair starts with inspection. The contractor examines both the flashing itself and the surrounding materials. They’re checking for rust, gaps, loose mortar, and water stains on nearby wood. Sometimes the problem is obvious. Other times, it takes careful probing to find where water is sneaking in.
Once they’ve pinpointed the damage, the old flashing needs to come out. This means carefully removing counter flashing pieces embedded in the chimney mortar joints and pulling up step flashing that’s woven into the shingles. If the mortar is crumbling, the contractor will grind out damaged joints to prepare for new material. Roofing materials around the chimney often need to be lifted or temporarily removed to access everything properly.
Here’s the thing. You’re not just working with metal. You’re dealing with two very different systems that have to work together. The roofing side involves shingles, underlayment, and water channels. The masonry side involves mortar joints, brick or stone surfaces, and expansion rates that differ from roofing materials.
Installing New Materials
Surface prep matters more than most homeowners realize. Any old sealant gets scraped off completely. Mortar joints get cleaned out to the proper depth, usually about three quarters of an inch. The chimney and roof deck both need to be dry before new materials go on, or you’re just trapping moisture inside.
New step flashing gets installed one piece at a time, working up the roof slope. Each piece overlaps the one below it and tucks under the shingle above. Counter flashing embeds into the recut mortar joints on the chimney face, then those joints get packed with fresh mortar. Base flashing goes down where the chimney meets the roof deck.
The final step involves high-grade sealant at critical junctions and a careful inspection of the mortar work. Everything needs to shed water away from the chimney, not funnel it into gaps. That’s why this work requires someone who understands both trades. Miss something on either side, and the repair fails within a season or two.
Why Proper Flashing Repair Matters
Flashing failures are one of the most common sources of roof leaks. The good news is they’re also one of the most fixable. But when left alone, even a small gap in flashing can lead to problems that spread faster than most homeowners expect.
What usually happens is this. Water finds its way past the flashing and soaks into the roof decking beneath the shingles. You won’t see it from inside your home at first. But over weeks and months, that decking starts to rot. The wood softens, loses strength, and eventually the framing around it can weaken too.
At the same time, water moves downward. It spreads across the attic floor, works its way into insulation, and eventually reaches the drywall on your ceilings or walls. That’s when you see the stains. By then, the damage has already been happening for a while.
Chimney Damage and Mold Growth
Around chimneys, flashing leaks cause a different kind of problem. Water gets between the masonry and the mortar joints. In winter, that water freezes and expands. Come spring, it thaws. This freeze-thaw cycle cracks the mortar and loosens bricks over time. Chimney flashing problems left unaddressed can lead to serious masonry repairs down the line.
Mold is another issue. It grows wherever moisture sits in dark, poorly ventilated spaces. Attics are perfect for this. Once mold takes hold in the wood or insulation, it spreads quickly. Removing it means replacing materials, not just cleaning surfaces.
Here’s the thing. Most of these problems don’t start because the roof failed. They start because a small piece of metal pulled away or cracked, and nobody caught it early. Roof flashing issues don’t fix themselves, but they do get worse. The earlier you repair flashing deterioration, the less damage it causes to everything around it. That’s what makes routine checks worth the effort.
Common Misconceptions About Flashing Repair
Most homeowners have never dealt with chimney flashing until water shows up inside. That’s when the myths start causing problems.
The biggest misconception is that roof tar or caulk can fix it permanently. Here’s what really happens. Tar and caulk are temporary patches. They harden, crack, and pull away from metal in Indianapolis heat cycles. A tube of caulk might buy you a few months, but water finds its way through again because the underlying metal hasn’t been addressed. The flashing itself needs proper sealing, proper overlap, and sometimes complete replacement. Slapping tar over failing flashing is like putting a Band-Aid on a broken bone.
Many people also think flashing repair is the same as roof repair. It’s not. Roofers focus on shingles and underlayment. Flashing requires different skills. You’re working with metal fabrication, soldering sometimes, and understanding how water moves around a chimney structure. A roofer might replace your shingles perfectly and still leave flashing problems untouched.
What Actually Needs Replacing
Another common belief is that any flashing leak means your whole chimney needs rebuilding. That’s rarely true. Most flashing leaks happen because the metal has corroded or the sealant failed. The chimney bricks and mortar are usually fine. You might need new step flashing or a new counter flashing piece, but the entire chimney structure doesn’t need to come down.
Homeowners often assume flashing lasts as long as the roof. It doesn’t. Shingles might give you 20 to 25 years. Flashing, especially if it’s galvanized steel, starts showing problems in 10 to 15 years in our climate. The metal expands and contracts more than shingles do. It takes more direct sun exposure on south-facing chimneys.
Finally, there’s the idea that you can DIY this with hardware store materials. Let’s be honest. You can buy flashing and sealant at any store. But cutting precise angles, layering the pieces correctly, and ensuring water doesn’t flow backward requires experience. One wrong fold and you’ve created a new leak path worse than the original.
Practical Guidance for Homeowners
Knowing when flashing needs attention saves you from bigger problems down the road. Water stains on your ceiling or walls near the roofline are the most obvious warning sign. You might also see rust streaks running down from vents or chimneys, or notice loose pieces of metal around these areas after a storm. If you can safely look at your roof from the ground with binoculars, visible gaps where flashing meets your roof or walls should catch your attention.
Here’s the thing. Most homeowners don’t realize flashing should be inspected every few years, even if nothing looks wrong. After severe weather like hailstorms or high winds, get it checked. Always have it inspected during any roof work, because that’s when contractors can see what’s hidden underneath.
Questions to Ask Before Hiring
When talking to a contractor about roof flashing maintenance, ask what specific material they plan to use. In Mid West, you want something that can handle intense sun and temperature swings. Galvanized steel works well here, and copper lasts even longer if your budget allows. Aluminum is another solid choice for our climate.
Ask how they’ll match the new flashing to your existing roof system. A good contractor explains whether they’re replacing just the damaged section or redoing the whole area to prevent future leaks. That matters because patchwork repairs sometimes fail faster than complete replacements.
Find out how long the work takes. Most flashing replacement jobs finish in a day or two, depending on how many areas need attention. If someone says it’ll take a week for a simple chimney repair, that’s worth questioning.
Let’s be honest. Not every contractor explains their process clearly. If they can’t tell you why they chose a particular material or method for your situation, keep looking. You want someone who understands how Mid West weather affects different metals and sealants over time. The right contractor talks about ventilation, expansion, and how materials bond together. Those details matter more than a low quote.
Chimney Flashing Repair FAQs
How Long Does Chimney Flashing Last?
Most chimney flashing lasts between 20 and 30 years if it’s properly installed and maintained. That said, what you’re working with matters. Aluminum flashing tends to sit on the shorter end, while copper can last 50 years or more. Here’s the thing. Even good flashing wears down faster if your roof gets a lot of sun exposure or experiences freeze and thaw cycles. In Indianapolis, our intense summer heat can break down the sealant around flashing joints faster than you’d expect. Most homeowners don’t realize the caulk or roofing cement used around flashing needs reapplication every few years to keep water out. Without that maintenance, even newer flashing can start leaking within a decade.
Can I Repair Chimney Flashing Myself?
Small fixes like resealing visible gaps with roofing cement are doable if you’re comfortable on a ladder and know what you’re looking at. But full chimney flashing replacement or anything involving counter flashing removal really should go to someone experienced. What usually happens is homeowners patch a visible crack without realizing the real problem is hidden under shingles or inside the mortar joints. You might stop one leak temporarily but miss others developing nearby. Working around a chimney also means cutting and bending metal to fit tight angles, then properly layering it with shingles so water flows correctly. Get that sequence wrong and you’ve created new leak paths. Let’s be honest, most DIY flashing repairs end up needing professional correction within a year or two.
What Causes Chimney Flashing to Fail?
The most common culprit is dried out sealant. The caulk or cement used where metal meets brick shrinks and cracks over time, especially under Mid West sun. That’s usually when problems start. You’ll also see issues from improper installation. If the step flashing wasn’t tucked correctly under shingles or the counter flashing wasn’t embedded deep enough into mortar joints, water finds its way in. Rust is another big factor with older galvanized or steel flashing. Once corrosion eats through the metal, you’re looking at replacement, not repair. And then there’s settlement. Houses shift slightly over the years, and that movement can pull flashing away from the chimney or roof deck.
How Do I Know if My Chimney Flashing Needs Repair?
Water stains on the ceiling or walls near your chimney are the obvious sign. But you might also notice rust streaks running down the brick or missing chunks of sealant around the flashing base. After heavy rain, check your attic with a flashlight. Look for dampness or water trails on the rafters closest to the chimney. It might not look serious at first, but even small leaks cause hidden damage. Some homeowners only discover flashing problems when they see daylight peeking through gaps where the metal meets the roofing or brickwork. If the flashing metal itself looks wavy, bent, or has visible holes, that’s your answer right there.
Conclusion
Chimney flashing doesn’t make anyone’s home improvement highlight reel. It’s not the kind of upgrade you show off to neighbors or photograph for social media. But it’s one of those quiet, essential systems that keeps everything else inside your home safe and dry.
Here’s the thing. The junction where your chimney meets the roof is one of the most vulnerable spots on your entire house. Water always finds a way in, and when it does, the damage spreads fast. A small gap in the flashing around your chimney can turn into rotted decking, ruined insulation, stained ceilings, and mold growing inside your walls. What starts as a minor weatherproofing issue becomes a costly structural problem.
That’s why understanding this system matters. When you know how chimney waterproofing actually works, you can spot trouble early. You notice the small rust spots, the lifted corners, the missing sealant. You catch problems when they’re still manageable instead of waiting until water is dripping into your living room.
Most homeowners don’t think about their roof flashing until something goes wrong. But the ones who do, the ones who pay attention to these critical junctions, end up saving themselves thousands of dollars and a lot of stress. They understand that home maintenance isn’t always about the big, visible projects. Sometimes it’s about the small interventions at the right time.
Chimney flashing might never be exciting. But knowing it’s there, doing its job correctly, protecting your home from water damage? That’s the kind of quiet confidence that comes with responsible homeownership.
Frequently Asked Questions
How Often Should I Have My Chimney Cleaned?
Most homeowners should have their chimney inspected once a year and cleaned as needed. If you regularly use a wood-burning fireplace, creosote can build up inside the flue over time. This buildup is highly flammable and can increase the risk of a chimney fire. Even if you don’t use your fireplace often, debris, animal nests, and moisture can still create safety concerns. An annual chimney inspection helps ensure your fireplace and chimney system remain safe, clean, and ready to use throughout the year.
How Much Does a Chimney Inspection Cost?
The cost of a chimney inspection depends on the type of inspection required and the condition of the chimney. Basic inspections are typically less expensive, while more detailed inspections may include specialized equipment such as chimney cameras to evaluate the entire flue system. A professional inspection can help identify potential issues before they become costly repairs, making it one of the most valuable investments homeowners can make for their fireplace and chimney.
Is a Chimney Inspection Really Necessary If Everything Seems Fine?
What Are the Signs That My Chimney Needs Repair?
Will Homeowners Insurance Cover Chimney Repairs?
What Is Included in a Professional Chimney Inspection?
A professional chimney inspection typically includes a thorough evaluation of the chimney structure, fireplace, flue, chimney cap, crown, masonry, and other visible components. The technician checks for damage, blockages, creosote buildup, water intrusion, and potential safety hazards. Depending on the inspection level, specialized camera equipment may also be used to inspect areas that cannot be seen from the ground or fireplace opening. After the inspection, homeowners receive recommendations for any cleaning, maintenance, or repairs that may be needed.